Global Trade Station
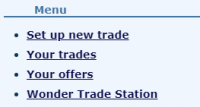
The Global Trade Station is one of the best and quickest ways to find Pokemon and items you need. You are able to put any Pokemon and item up for trade, and wait for other users to offer. You cannot offer or set up eggs.
The Global Trade Station can be accessed by hovering over the Town tab located at the top of every page.
Trade Search

On the Global Trade Station page, you are able to choose between four options:
- Public Trades - Every trainer can see and offer on these trades.
- Private Trades - These trades are only visible to specific users who you select during the setup process. You can also select groups of people, such as everyone on your friendlist.
- Gift - You must specify a recipient who will receive all selected items without them sending anything back in return. In case the recipient declines the gift, and you would also happen to cancel your gift to the recipient, then your items will be transferred back to your account. Pokémon gifts are not possible.
- Item Market - You can anonymously trade items here with other trainers on the site.
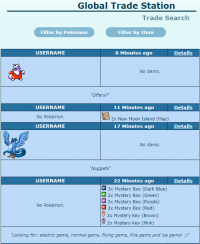
A list of all Public Trades will be displayed after choosing so in the Trade Search section. This is the main section of the Global Trade Station.
All Pokémon and Item trades are listed in chronological order by date. In the overview the Pokémon sprite with each item and quantity are displayed.
Clicking on the Details link, then you will go to the actual trade page. It shows you every Pokémon in detail (sprite, name, gender, level, the held item, nature and a summary link) and all items again. At the bottom you will find an
button.
The 'Place an offer'-page looks like the 'Set up a Trade'-page, but it tells you how many Pokémon you need to add in order for the trade to be able to be accepted.
You can only offer Pokémon and items you possess and which are in your Party/Storage Boxes (not busy) and Item Bag.
You cannot offer on your own trades. By clicking the Details link will show you the same page, but you will find a button instead of an Offer button. If Users have offered on this trade, then you will see a list of those offers and an 'Accept'-button.
Filter function
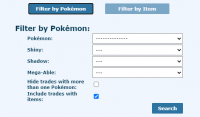

With the new update also came the filter function. Now you can search for a specific Pokémon, choose if it should be shiny and or mega-able, and if you wish just to search for trades without items or just this one type of Pokémon.
The Item filter is similar. You can choose to search for item trades only, for a specific item with or without others and if the trade also should have Pokémon or not.
Viewing your trades
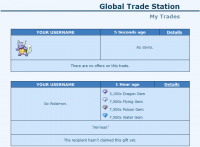
By viewing your trades, you see a list similar to the Search Trade Sections. It shows all the Gifts, Public and Private Trades you have set up in chronological order with how many offers you have on a specific trade.
To accept or cancel a trade, you need to click the Details link, and then click on the corresponding button of your choice.
Viewing your offers

By viewing your offers, you can view all of your offers that you've made on other trainer's trades. By clicking the Details link, you can offer again on the same trade or cancel it completely.

Set up a new trade
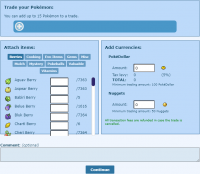
As of the new GTS update from April 1st, 2017: you are now able to set up more than one Pokemon, and also make item only trades.
You can choose to set up to 15 Pokemon at once, and a variable amount of items and currencies. The items will need to be in your itembag while you can choose Pokemon from your Party or your Boxes which are not busy.
While choosing a Pokemon, it will display it's name, level, whether it is a shiny or not, and it will show the item the Pokemon is also holding.
You can cancel trades at any time and the set up Pokemon and items go back to their place of origin. PokéDollars and Nuggets will be refunded completely.
Before setting up a new trade, you have the option to add a comment at the bottom of the page. Even if it's optional, it's recommended to fill it out if you're looking for something specific. BBCodes will not be displayed!
Public Trade
If you choose the 'Public Trade' option, your Pokemon and items will be seen by every other user and they can offer on them. You can select up to 15 Pokemon you currently own in one trade and as many items as you like. You cannot set up eggs!
Private Trade
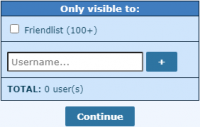
In this section you have to choose which user-group will be able to see your trades. You can set up trades for your whole friendlist to see or add certain users by their names. After choosing the user-group you can choose Pokemon and items like in the Public Trade section.
Gift
You can only gift items, Pokédollars and Nuggets. First you have to choose one user who you would like to send a gift to before being able to choose the items you would like to gift.
* You can also go to the user's profile and choose .png) Gift some items from their Contact panel.
Gift some items from their Contact panel.
Wonder trades
As of 25th April 2014, a new type of trade has been implemented, the Wonder Trade. This trade consists of leaving some Pokémon (up to 5) for trade, and at 10 PM server time, they will be randomly exchanged for Pokémon that other users have left in their Wonder trades as well. You will not know who you are trading with until after the trade has been completed, by checking the wonder trade history.
If you have participated in a Wonder trade, you will receive a notification when it happens, telling you what you obtained from the trade.
- There are two types of Wonder trades: Regular and Shiny Wonder Trades.
- Wonder trades are unlocked at Trainerlevel 8.
Note: What you get from the trade is completely random. This means you can set up a common Pokémon and you can get a rare one, or even Shinies and legendaries (if any have been set up) or vice versa.
Setting up a wonder trade

To set up a wonder trade, choose the Pokémon you want to trade from your boxes/party and they will be ready for the Wonder trade. You can take your Pokémon back at any time if you change your mind before the trade happens.
Wonder trade Slots
The maximum number of wonder trades you can set up at a time is given if you meet certain requirements. The maximum number of Wonder trades that you can set up at the same time is 5 for the regular and shiny section.
| Wonder Trade Slots | |
|---|---|
| 1 | Basic |
| 2 | Unlocked at Trainerlevel 15 |
| 3 | Unlocked at Trainerlevel 20 |
| 4 | Unlocked with a Premium Account |
| 5 | Unlocked upon having a |
Wonder Trade raffle

Every day, one random Pokémon at the Wonder Trade Station is exchanged for a secret Pass Code, which can be submitted at the bottom of the page. Upon submitting a Pass Code, you will obtain an Ho-Oh egg.
Secret Pass Codes can be redeemed by any user, not only the one who originally received it, meaning you can give the code to any other user so they can obtain the egg instead. However, each pass code can only be submitted once.
Shiny Wonder Trade
As of May 2015 a new feature of "shiny wonder trade" has been introduced. This works in a similar fashion as the normal wonder trade.
- You can only set up shiny pokemon for exchange
- Wonder Trade does not take place daily, pokemon will be traded every Wednesday and Saturday at 10 PM [server time]
- A regular Ho-Oh pass code is given out every wondertrade to a random participant, but very rarely, a shiny Ho-Oh pass code is given out.
Item Market
The Item Market is a newly introduced system as of June 7th, 2020. The Item Market can be accessed through the Trade Search section of the Global Trade Station page.
The Item Market was made to be an easier and more user friendly way to buy and sell items between other trainers on the site. The Item Market is handled differently in regards to taxes in comparison to a traditional trade in the Global Trade Station. In the Item Market, the buyer doesn't have to pay the 5% tax levy, but instead the seller does when their item is sold. All listings and transactions made through the Item Market are also anonymous.
Sell your items

The first thing you'll see in the Item Market is a section to sell your items. From the drop down menu, you will be able to select any item that you would wish to sell in the Item Market. After selecting an item, then you can enter the amount of the item that you wish to list up in the Item Market, as well as the price. You may also notice text that will appear above the button. This text will tell you the recommended price of the item that you're trying to sell. The recommended price is based off the price point that other trainers typically buy an item at. There may also be a current best price for an item listed. The current best price means that's the lowest price in which you can currently buy the item that you're trying to sell. The current best price will not appear if there are no listings of an item that's currently available in the Item Market.

After you list up items in the Item Market for sale, then an area will appear under the same section. You are able to view all of your items listed in this area, and you are also able to cancel any item(s) you've listed up for sale at any given time. There is currently no known limit for the amount of item listings you can have up in the Item Market. Your item listings can also stay up in the Item Market indefinitely.
Note: Keep in mind the 5% tax levy when selling your items!
Buy someone's items

You are able to search for item listings that other trainers have listed up for sale in the Item Market. You can either search for an item specifically, or search for items that are categorized into groups. After searching for an item or item category, then you should notice that a Search Results section will show up under the search area. You will see the available amount of each item listed along with the price per item. To purchase items you need to enter the desired amount of a specific item in the input field to the left of the button.

After buying any item(s), they will be placed directly into your Item Bag and will be immediately available. You can also view your transaction history of purchased items you've bought from the Item Market at the Emera Bank.
Advanced search filters
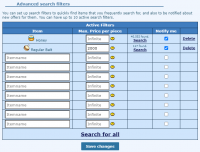
At the bottom of the Item Market page, there are the Advanced search filters. These filters can help you keep track of items in the Item Market much easier. They can also help you out with finding items at certain price points, and can also notify you about them as soon as they're available.
You can have a max of up to 10 active filters for different items. When filtering an item and entering its name, it's not required for it to be case sensitive. It's also not possible to have two different filters of the same item. Attempting to filter the same item twice will overwrite the first filter of that item.

By default when filtering an item it will search for an item up to an infinite price point. That's if you don't set a desired max price point in the input field. If you do set a desired price point, then the filter will search for any item for sale that's equal to or less than your desired price point.
If you choose to be notified from an item which you have filtered, then you will be notified through your Notifications about that item. Once an item becomes available in the Item Market that meets your price point or better, then you will be immediately notified about it. The notification will tell you the quantity of the item that had been listed up as well as its price.
If you currently have two or more items that have search results through the Advanced search filter, then you will notice a link at the bottom that says Search for all. Clicking on this will allow you conveniently view all of your filtered search results.
Pay Day
In the instance that you would sell any item(s) in the Item Market, then you will be immediately sent a Notification.

The notification will notify you about how many PokéDollars were earned from your Item Market sale(s). You will also be able to claim the revenue by clicking the Claim revenue link. This will redirect you back to the Item Market page. At the top of the page under the "Sell your items" section, you will see a green area where you can view your revenue. Your total revenue will be what you will receive after the 5% tax levy.

An important thing to note is that you can claim your revenue from the Item Market at any given time. Also, additional sales made in the Item Market will add onto any unclaimed revenue. If and when you decide to claim revenue from the Item Market, then your revenue will be transferred instantly to your account's main balance.